Neovim Beginner's Guide (Part 4): LSP Configuration (II)
Neovim Beginner’s Guide (Part Three): LSP Configuration (Part One) discussed what LSP is, how to configure it, and how to start it. Now, let’s proceed with other configurations related to LSP. This chapter mainly covers the following aspects: code highlighting, code formatting, and UI beautification related to LSP.
⚠️ Error Warning Prompt
After setting up LSP, when we write code and encounter errors, corresponding reminders will appear. As shown in the following image:

Currently, the errors are represented by letters, for example, warnings are shown as W, which is not very visually appealing. For this, Vim provides relevant interfaces that can be configured using interfaces, neovim-diagnostic.
Continue to create a ui.lua directory under the LSP folder.
-- lsp/ui.lua
-- Icon for error warnings
vim.diagnostic.config({
virtual_text = true,
signs = true,
-- Update prompts even in insert mode, setting to true may affect performance
update_in_insert = true,
})
local signs = { Error = "", Info = "", Hint = "", Warn = "" }
for type, icon in pairs(signs) do
local hl = "DiagnosticSign" .. type
vim.fn.sign_define(hl, { text = icon, texthl = hl, numhl = hl })
endWhere vim.diagnostic.config is used to configure the prompt text, virtual_text is for error message prompts.
🔅 Code Highlighting
In the current setup, code highlighting is not perfect and requires a plugin to achieve it. tree-sitter is a high-performance code highlighting rendering tool written in Rust, which many editors use for highlighting, such as Zed. Based on tree-sitter, we can make the highlighting in Neovim more perfect.
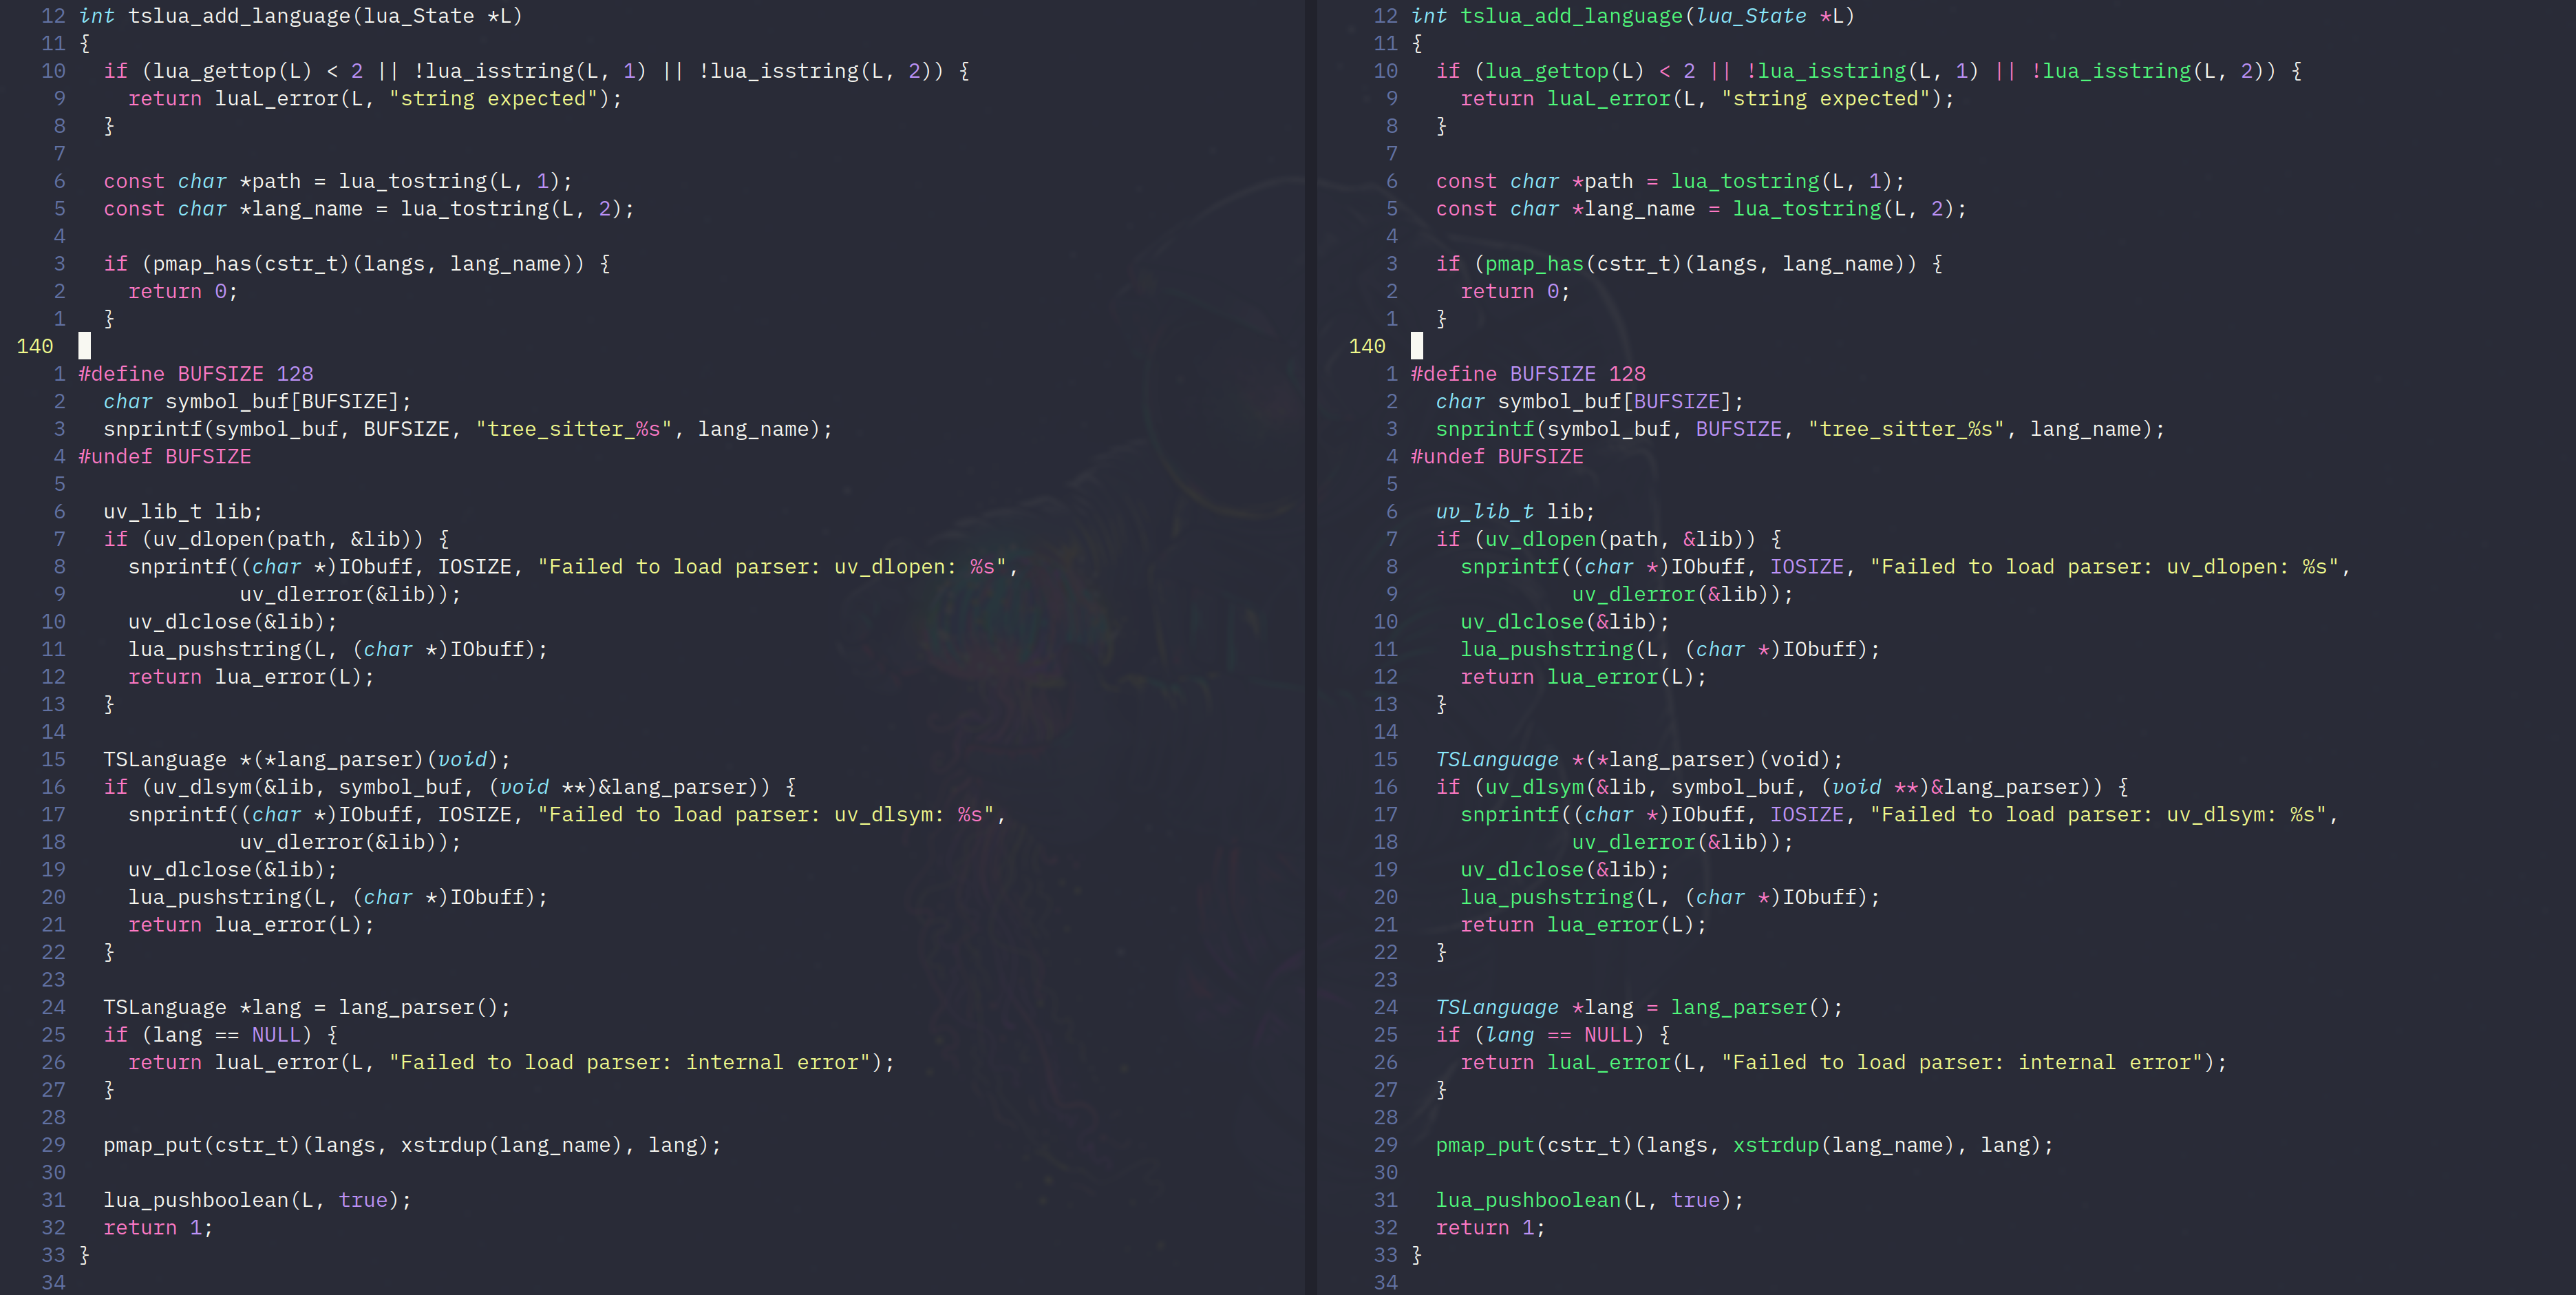
This image is from nvim-treesitter. The left side shows the code highlighting without treesitter enabled, and the right side shows the effect after enabling it, which is quite noticeable.
After installing tree-sitter, you can install specific language highlights using TSInstall, for example, to install Rust highlighting, you can directly use the TSInstall rust command, or use TSUpdate rust to update. The overall installation and configuration are relatively simple, so I won’t explain it further here.
📃 Formatting
Code formatting is a very important and frequently used feature. There are many ways to format code in Neovim. Here, we mainly introduce null-ls. Unfortunately, null-ls has been archived, but fortunately, its fork project none-ls has been revived and is still compatible with null-ls configuration. If you were previously using null-ls, you only need to change the dependency address from jose-elias-alvarez/null-ls.nvim to nvimtools/none-ls.nvim.
After installing none-ls, you can install relevant formatters using Mason, for example, to install the lua formatter. Open the installation interface with the :Mason command.
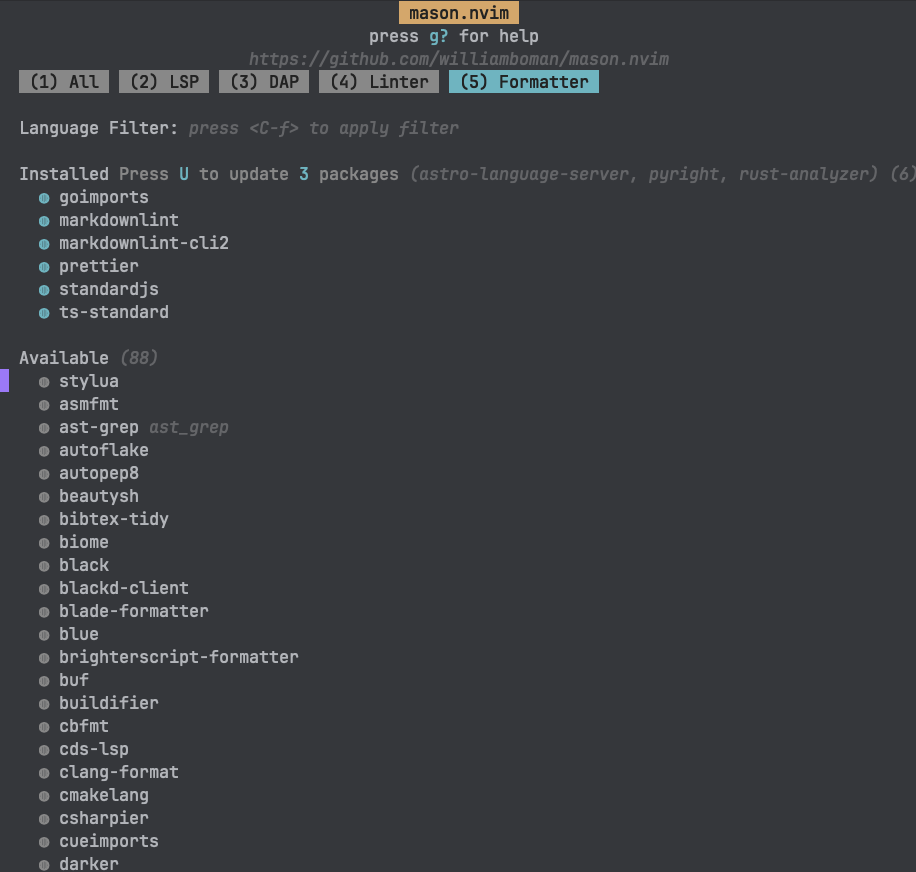
Select stylua for installation. After installation, you can configure it. Create a new file named nonels.lua under lua/lsp.
-- lsp/nonels.lua
-- Even if none-ls is used, we still get null-ls here
local status, null_ls = pcall(require, "null-ls")
if not status then
	vim.notify("Null-ls not found")
	return
end

local formatters = null.builtins.format

null_ls.setup({
    sources = {
        -- Stylua
        formatters.stylua,
        -- Other formatter methods
    },
})
This allows us to perform relevant formatting when writing code. As mentioned in the previous article, key bindings are also provided. Use <Leader>= for formatting.
🎨 Autocomplete Beautification
As mentioned earlier, we achieved autocomplete through the cmp plugin, which can supplement code from different sources.
When using some IDEs or editors, icons are displayed in the completion options to identify the types of completions, such as variables, class names, methods, or interfaces.
Autocomplete style with RustRover.
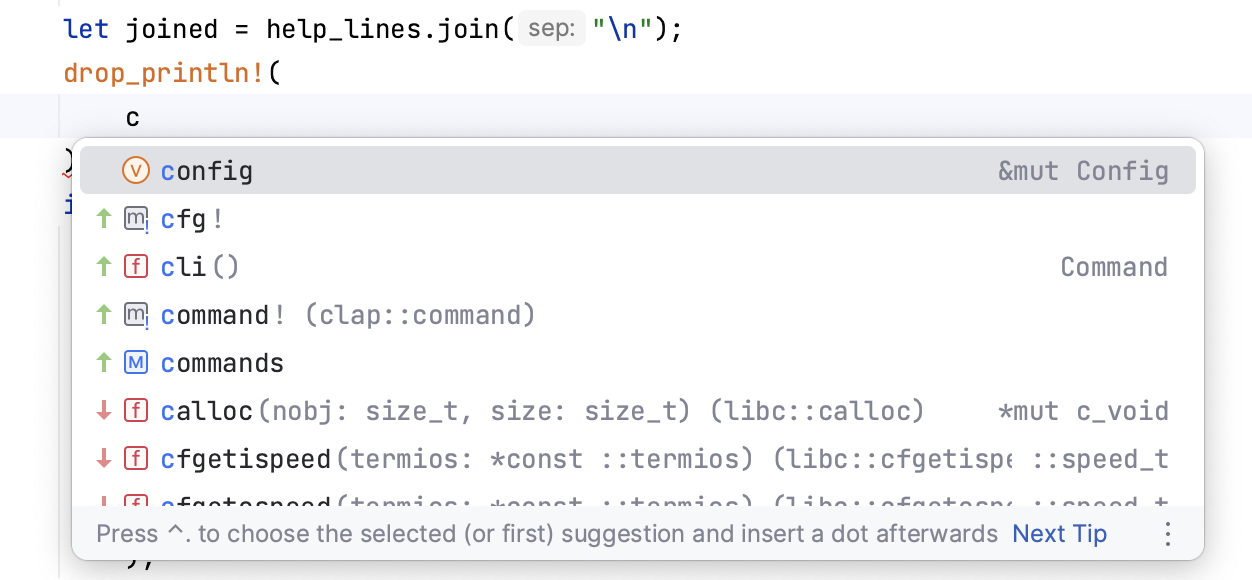
Autocomplete style in VS Code.
![]()
Through configuration, we can achieve similar autocomplete styles in Neovim.
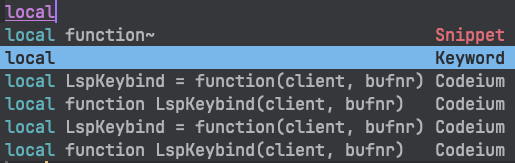
The current autocomplete effect is as follows, with the completion fields on the left and the completion types identified by text on the right.
There is a plugin called lspkind, which, when installed, combined with our cmp, achieves the above styles.
Create a file kind.lua under lsp to configure kind, which can be found in lspkind.
-- lsp/kind.lua
local lspkind = require("lspkind")
lspkind.init({
mode = "symbol_text",
preset = "codicons",
symbol_map = {
Text = "",
Method = "",
Function = "",
Constructor = "",
Field = "",
Variable = "",
Class = "",
Interface = "",
Module = "",
Property = "",
Unit = "",
Value = "",
Enum = "",
Keyword = "",
Snippet = "",
Color = "",
File = "",
Reference = "",
Folder = "",
EnumMember = "",
Constant = "",
Struct = "",
Event = "",
Operator = "",
TypeParameter = ""
},
})You can configure icons for each category here, and after configuration, apply them in cmp. The main purpose is to modify the style of prompts. Here, we mainly refer to a style on Github. Configuration is done in the formatting section.
-- cmp.lua
cmp.setup({
    -- Omitted other code
    formatting = {
        completion = { border = { "╭", "─", "╮", "│", "╯", "─", "╰", "│" }, scrollbar = "║" },
        documentation = {
            border = { "╭", "─", "╮", "│", "╯", "─", "╰", "│" },
            scrollbar = "║",
        },
        format = lspkind.cmp_format({
            mode = "symbol",
            maxwidth = 20,
            ellipsis_char = "...",
            before = function(entry, vim_item)
                -- Get the full snippet (and only keep first line)
                local word = entry:get_insert_text()
                if entry.completion_item.insertTextFormat == types.lsp.InsertTextFormat.Snippet then
                    word = vim.lsp.util.parse_snippet(word)
                end
                word = str.oneline(word)
                if entry.completion_item.insertTextFormat == types.lsp.InsertTextFormat.Snippet
                    and string.sub(vim_item.abbr, -1, -1) == "~" then
                    word = word .. "~"
                end
                vim_item.abbr = word
                return vim_item
            end,
        }),
    }
    -- Omitted other code
})
The style after completion will be similar to VS Code as shown in the image below:

lspsage
lspsage greatly enhances the experience of Neovim’s LSP. Most of lspsaga’s functions aim to enhance and beautify the original LSP. You can refer to the specific documentation on nvimdev.
lspsaga’s main features include:
- Finder: A UI for advanced LSP symbol search
- Diagnostic: Navigate between diagnostics and display them in a beautiful floating window
- Peek Definition / Type Definition: View definition/type definition
- Hover: More visually appealing hover operations
- Rename: LSP rename and asynchronous project search and replace
- Call hierarchy: Incoming/outgoing calls
- Code Action: Beautiful code operation UI with real-time preview
- LightBulb: Similar to VSCode’s light bulb, indicating possible code actions
- Breadcrumb: IDE symbol outline similar to WinBar
- Outline: IDE symbol outline similar to IDE
- Implementation: Easily view the number of implementations and quickly jump to them
- Float Terminal: A simple floating terminal
- Miscellaneous: Options for all modules
The above information is from the official documentation.
Finder
The Finder feature provides a UI similar to VS Code for viewing variables/functions, allowing you to see where a variable/function is defined and called.
-- keybindings.lua
-- Other code
pluginKeys.mapLSP = function(mapbuf) {
    -- Other code
    mapbuf("n", "gf", ":Lspsaga lsp_finder<CR>", opt) -- Added
    -- Other code
}
This way, pressing gf in normal mode will bring up the Finder window shown above.
Code Action
Code Action is a very important feature that provides suggestions or code improvements based on the context of the code. For example, in the provided code snippet, Code Action suggests converting the concatenation to a literal.

Code Action is not provided by lspsaga, but lspsaga provides a beautiful interface for it. Wherever Code Action is available, there will be a yellow light bulb 💡 prompt.
Below is how to bind the shortcut:
-- keybindings.lua
pluginKeys.lspKeybinding = function(mapbuf)
 -- Omitted other code
 -- code action
 -- mapbuf("n", "<leader>ca", ":lua vim.lsp.buf.code_action()<CR>", opt) -- Original
 mapbuf("n", "<leader>ca", ":Lspsaga code_action<CR>", opt) -- Replace with this
end
Float Terminal
lspsaga provides a floating terminal window where you can execute any command in the terminal. You can bind a shortcut in keybindings, or use the default shortcut t to open and close the terminal.
lspsaga provides many other features, each of which is helpful. Here, we’ve covered the common functionalities and configurations of LSP. You can install and configure the ones you need.
Here’s my configuration youngxhui/nvim for reference.
Conclusion
Using Vim/Neovim does have a learning curve, especially if you’re used to arrow keys for navigation. However, once you’re completely comfortable with h, j, k, and l for cursor movement, you’re not far from mastering Vim/Neovim.
After getting accustomed to Vim’s style, you might try to adopt Vim shortcuts in your other editors/IDEs. Once you’re familiar with Vim shortcuts, you’ll truly feel your fingers dancing on the keyboard.
Whether it’s Neovim or related plugins, updates are frequent. Perhaps by the time you read this article, many of the configurations mentioned may have become obsolete, or the related plugins may have been discontinued. This article is just a starting point, and I believe you’ll find the Neovim configuration that suits you best.
I believe people who like Vim/Neovim are curious and enjoy tinkering. It’s this curiosity that drives us forward step by step.
With these thoughts, I conclude here, and in the next article, we’ll discuss DAP.
Related Content


If you feel that this article has been helpful to you, your appreciation would be greatly welcomed.
Sponsor