第一个 Android 项目
想想也是有点意思,自己的第一个相对完整的 Android 项目竟然是在金钱的诱惑下完成的。
起因
事情是这样,在前两天,在学校的某个群内,看到一个哥们找做课程设计。于是乎就拦下了。谈好价钱 120 。120 就把我给收买了。简单的看了一下需求文档。
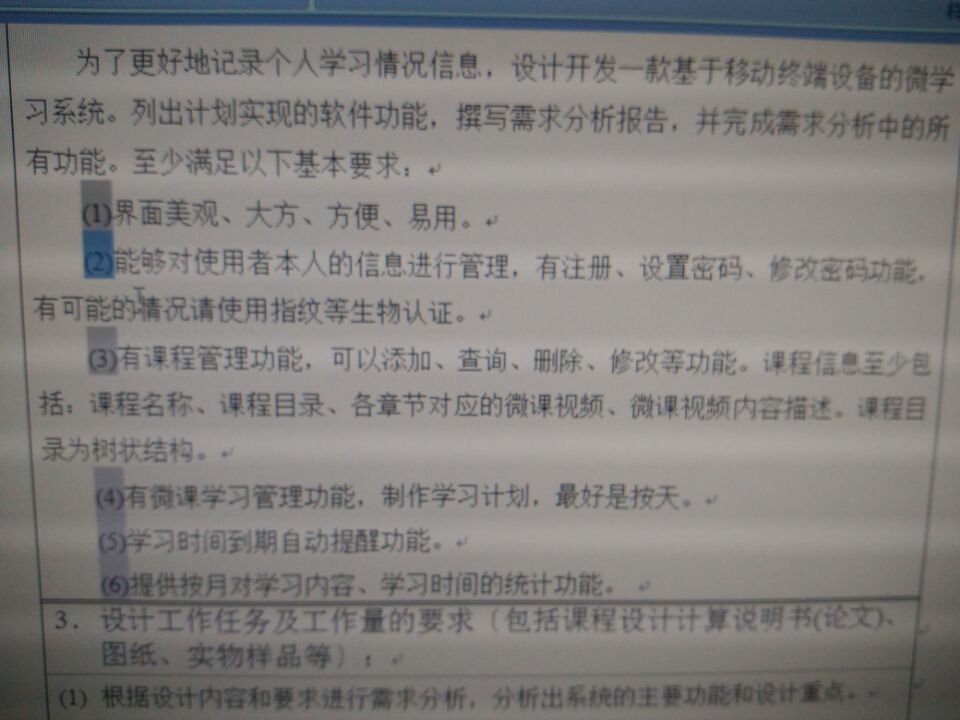
其实我也是个半吊子,从来没有这样完整的写过,之前都是一个个小 Demo 这样写的。所以,自己看了一下没敢全接,就答应了任务为1,2,3,4。现在看来,120的价格,赔的连内裤都没有了。
从周五下午开始写的,到周一中午交付,计算一下也就是三天左右。每天估计要写近 8 - 9 小时左右,感觉自己的身体要被掏空了。
需求分析
其实就是三个功能,视频展示,计划展示,用户管理,每个不外乎就是 增删改查 四个功能。简单的分析过后,就开始动手编码。
编码阶段
说实话,之前从来没有写过 Android 数据库 sqLite,recycleView没有完全使用过,NavagationView没有使用过,视频获取播放没用过,不知道 Android 的开发模式,于是乎就开始边学边做模式,最后对我可以做出来,其实我也感到惊奇。
果然
有钱能使鬼推磨
NavigationView
NavigationView 这个控件是 Google 的在 MD 设计中引入的滑动菜单,在 Google 自己的 App 上有很多应用。
NavigationView 分为两部分。menu 和 header 。menu为下面的选项,header 上面整块。
menu.xml
<?xml version="1.0" encoding="utf-8"?>
<menu xmlns:android="http://schemas.android.com/apk/res/android">
    <group android:checkableBehavior="single">
        <item
            android:id="@+id/nav_class"
            android:icon="@drawable/ic_format_list_bulleted_black_24dp"
            android:title="课程" />
        <item
            android:id="@+id/nav_plan"
            android:icon="@drawable/ic_access_time_black_24dp"
            android:title="计划" />
    </group>
    <group android:checkableBehavior="single">
        <item
            android:id="@+id/action_settings"
            android:icon="@drawable/ic_settings_black_24dp"
            android:title="修改密码" />
    </group>
</menu>
在 menu 中可以嵌套 group 和 item。group 可以看做一个组,我们可以对这个组里面的 item 定义属性,这里定义的是 single 表示每个 item 只能单选。
下面定义 header
header.xml
<?xml version="1.0" encoding="utf-8"?>
<android.support.constraint.ConstraintLayout xmlns:android="http://schemas.android.com/apk/res/android"
    xmlns:app="http://schemas.android.com/apk/res-auto"
    xmlns:tools="http://schemas.android.com/tools"
    android:layout_width="match_parent"
    android:layout_height="match_parent"
    android:background="@color/colorPrimary">

    <de.hdodenhof.circleimageview.CircleImageView
        android:id="@+id/icon_image"
        android:layout_width="120dp"
        android:layout_height="120dp"
        android:src="@drawable/header"
        app:layout_constraintBottom_toBottomOf="parent"
        app:layout_constraintLeft_toLeftOf="parent"
        app:layout_constraintRight_toRightOf="parent"
        app:layout_constraintTop_toTopOf="parent"
        tools:layout_constraintBottom_creator="1"
        tools:layout_constraintLeft_creator="1"
        tools:layout_constraintRight_creator="1"
        tools:layout_constraintTop_creator="1" />

    <TextView
        android:id="@+id/icon_username"
        android:layout_width="wrap_content"
        android:layout_height="wrap_content"
        android:layout_marginBottom="8dp"
        android:layout_marginEnd="8dp"
        android:layout_marginLeft="8dp"
        android:layout_marginRight="8dp"
        android:textColor="@color/white"
        android:text="username"
        android:textSize="16sp"
        app:layout_constraintBottom_toBottomOf="parent"
        app:layout_constraintLeft_toLeftOf="parent"
        app:layout_constraintRight_toRightOf="parent"
        tools:layout_constraintBottom_creator="1"
        tools:layout_constraintLeft_creator="1" />
</android.support.constraint.ConstraintLayout>
header 表示上方的部分。我放了一个头像 ,头像使用了一个开源库 compile 'de.hdodenhof:circleimageview:2.1.0',这个库可以把图片转换为圆形。这个就是一个简单的布局,不过多介绍。
当我们设置好 header 和 menu 的时候就可以进行 NavigationVIew 的设置。
<?xml version="1.0" encoding="utf-8"?>

<android.support.v4.widget.DrawerLayout xmlns:android="http://schemas.android.com/apk/res/android"
    xmlns:app="http://schemas.android.com/apk/res-auto"
    android:id="@+id/drawer_layout"
    android:layout_width="match_parent"
    android:layout_height="match_parent">

    <android.support.design.widget.CoordinatorLayout
        android:layout_width="match_parent"
        android:layout_height="match_parent">
            <!--省略其他布局 -->
    </android.support.design.widget.CoordinatorLayout>

    <android.support.design.widget.NavigationView
        android:id="@+id/nav_view"
        android:layout_width="match_parent"
        android:layout_height="match_parent"
        android:layout_gravity="start"
        app:headerLayout="@layout/nav_header"
        app:menu="@menu/nav_menu">

    </android.support.design.widget.NavigationView>

</android.support.v4.widget.DrawerLayout>
NavigationView 要放在 DrawerLayout 里面。CoordinatorLayout/FrameLayout 是在主布局内要显示的。 NavigationView 通过 app:headerLayout 加载 header 通过 app:menu 加载 menu。
刚刚开始的时候,在 header 里面设置一个 ImageView 然后把头像和文字放到 ImageView 中,这样做不是不可以,但是如果 ImageView 中是一个图片,会对性能造成很大的影响,滑动栏会很卡。建议把背景直接通过父布局直接加载。
在布局中写完,下面需要进行 Java 代码。
public class MainActivity extends AppCompatActivity {

    private static final String TAG = "MainActivity";
    private DrawerLayout drawerLayout;
    private TextView uname;
    //省略其他代码

    @Override
    protected void onCreate(Bundle savedInstanceState) {
        super.onCreate(savedInstanceState);
        setContentView(R.layout.activity_main);
        //省略其他代码
        drawerLayout = (DrawerLayout) findViewById(R.id.drawer_layout);
        NavigationView navigationView = (NavigationView) findViewById(R.id.nav_view);
        ActionBar actionBar = getSupportActionBar();
        if (actionBar != null) {
            actionBar.setDisplayHomeAsUpEnabled(true);
            actionBar.setHomeAsUpIndicator(R.drawable.ic_menu_black_24dp);
        }
        navigationView.setCheckedItem(R.id.nav_class);
        navigationView.setNavigationItemSelectedListener(new NavigationView.OnNavigationItemSelectedListener() {
            @Override
            public boolean onNavigationItemSelected(@NonNull MenuItem item) {
                drawerLayout.closeDrawers();
                switch (item.getItemId()){
                    case R.id.nav_plan:
                        startActivity(new Intent(MainActivity.this,PalnActivity.class));
                        break;
                    case R.id.action_settings:
                        startActivity(new Intent(MainActivity.this,ResetActivity.class));
                        break;
                }
                return true;
            }
        });
        View headerView = navigationView.getHeaderView(0);
        uname= (TextView) headerView.findViewById(R.id.icon_username);
        uname.setText(message);
    }

    @Override
    public boolean onOptionsItemSelected(MenuItem item) {
        switch (item.getItemId()) {
            case android.R.id.home:
                drawerLayout.openDrawer(GravityCompat.START);
                break;
            case R.id.action_settings:
                drawerLayout.openDrawer(GravityCompat.START);
                break;
        }
        return true;
    }
    // 省略其他代码
}
通过 setCheckedItem 表示当前选择的 item 。setNavigationItemSelectedListener 来设置每个 item 的点击事件。
这个就是简单的 NavigationView 的简单使用。
RecyclerView
RecyclerView 在我刚刚开始学 Android 的时候就已经听说过,知道它比 ListView 优秀,所以说在做列表布局的时候直接想到了使用 RecyclerView 替代。
使用 RecyclerView 首先用做一个布局,布局文件为每个 item 要展示的效果。
我命名为 course_item
<?xml version="1.0" encoding="utf-8"?>
<android.support.constraint.ConstraintLayout xmlns:android="http://schemas.android.com/apk/res/android"
    xmlns:app="http://schemas.android.com/apk/res-auto"
    xmlns:tools="http://schemas.android.com/tools"
    android:layout_width="match_parent"
    android:layout_height="wrap_content"
    android:layout_margin="16dp"
    android:orientation="vertical">


    <ImageView
        android:id="@+id/img_video_rc"
        android:layout_width="60dp"
        android:layout_height="60dp"
        android:layout_marginBottom="8dp"
        android:layout_marginLeft="24dp"
        android:layout_marginRight="8dp"
        android:layout_marginStart="24dp"
        android:layout_marginTop="8dp"
        android:contentDescription=""
        android:src="@drawable/ic_slow_motion_video_black_24dp"
        app:layout_constraintBottom_toBottomOf="parent"
        app:layout_constraintHorizontal_bias="0.0"
        app:layout_constraintLeft_toLeftOf="parent"
        app:layout_constraintRight_toRightOf="parent"
        app:layout_constraintTop_toTopOf="parent"
        app:layout_constraintVertical_bias="0.0"
        tools:layout_constraintLeft_creator="1"
        tools:layout_constraintTop_creator="1"
        android:layout_marginEnd="8dp" />


    <TextView
        android:id="@+id/tx_classname_rc"
        android:layout_width="0dp"
        android:layout_height="wrap_content"
        android:layout_marginTop="16dp"
        android:maxLines="1"
        android:text="title"
        android:textSize="18sp"
        app:layout_constraintHorizontal_bias="0.0"
        app:layout_constraintLeft_toRightOf="@+id/img_video_rc"
        app:layout_constraintRight_toRightOf="parent"
        app:layout_constraintTop_toTopOf="parent"
        tools:layout_constraintLeft_creator="1"
        tools:layout_constraintTop_creator="1"
        android:layout_marginLeft="8dp"
        android:layout_marginRight="8dp"
        android:layout_marginStart="8dp"
        android:layout_marginEnd="8dp" />

    <TextView
        android:id="@+id/tx_classcontext_rc"
        android:layout_width="0dp"
        android:layout_height="0dp"
        android:layout_marginLeft="8dp"
        android:layout_marginRight="8dp"
        android:layout_marginStart="8dp"
        android:layout_marginTop="8dp"
        android:maxLines="2"
        android:text="context"
        app:layout_constraintHorizontal_bias="0.0"
        app:layout_constraintLeft_toRightOf="@+id/img_video_rc"
        app:layout_constraintRight_toRightOf="parent"
        app:layout_constraintTop_toBottomOf="@+id/tx_classname_rc"
        tools:layout_conversion_absoluteHeight="0dp"
        tools:layout_conversion_absoluteWidth="47dp"
        tools:layout_conversion_absoluteX="5dp"
        tools:layout_conversion_absoluteY="42dp"
        app:layout_constraintBottom_toBottomOf="parent"
        android:layout_marginBottom="8dp"
        android:layout_marginEnd="8dp" />

</android.support.constraint.ConstraintLayout>
这个为列表里每个 item 的显示样式。不多介绍。
在使用 RecyclerView 的时候,主要还是要有适配器。通过适配器来加载布局,绑定控件。
public class CourseAdapter extends RecyclerView.Adapter<CourseAdapter.ViewHolder> {

    private List<Course> list = new ArrayList<>();
    private Context context;

    @Override
    public ViewHolder onCreateViewHolder(ViewGroup parent, int viewType) {

        final View view = LayoutInflater.from(parent.getContext())
                .inflate(R.layout.course_item, parent, false);
        final ViewHolder holder = new ViewHolder(view);
        holder.courseView.setOnClickListener(new View.OnClickListener() {
            @Override
            public void onClick(View v) {
               //监听事件
            }
        });

        holder.courseView.setOnLongClickListener(new View.OnLongClickListener() {
            @Override
            public boolean onLongClick(View v) {
                //监听事件
            }
        });
        return holder;
    }

    @Override
    public void onBindViewHolder(ViewHolder holder, int position) {
        Course cl = list.get(position);
        holder.imageView.setImageResource(R.drawable.ic_slow_motion_video_black_24dp);
        holder.title.setText(cl.getCourseName());
        holder.context.setText(cl.getVideoContext());
    }

    @Override
    public int getItemCount() {
        return list.size();
    }

    static class extends RecyclerView.ViewHolder {
        View courseView;
        ImageView imageView;
        TextView title;
        TextView context;

        ViewHolder(View itemView) {
            super(itemView);
            courseView = itemView;
            imageView = (ImageView) itemView.findViewById(R.id.img_video_rc);
            title = (TextView) itemView.findViewById(R.id.tx_classname_rc);
            context = (TextView) itemView.findViewById(R.id.tx_classcontext_rc);
        }
    }

    public CourseAdapter(List<Course> courselist) {
        list = courselist;
    }
}
适配器继承了 RecyclerView.Adapter 主要有三个方法。onCreateViewHolder ,onBindViewHolder ,getItemCount
onCreateViewHolder
这个方法是用来创建一个 view,负责绑定 item 布局,添加监听。
onBindViewHolder
通过名字可以看出来,这是一个布局绑定的方法,主要用于 绑定我们写的 item 里面的布局文件。通过传入的 positon 获得每个 item的位置。然后对每个位置的 item 进行操作。
getItemCount
获得 item 长度,也就是你要展示出来多少个 item 。
除了上述的三个方法,其中还有一个内部类,内部类主要是用绑定 item 的布局。适配器主要是将前面的 list 传入进行适配
Adapter
我们在显示的 Activity 中,通过适配器将数据传入
public class MainActivity extends AppCompatActivity {

    private List<Course> courseList = new ArrayList<>();
    private CourseAdapter adapter;

    @Override
    protected void onCreate(Bundle savedInstanceState) {
        super.onCreate(savedInstanceState);
        setContentView(R.layout.activity_main);
        //其他控件绑定
        initClassList();
        RecyclerView recyclerview = (RecyclerView) findViewById(R.id.rclv_list);
        LinearLayoutManager layoutManger = new LinearLayoutManager(this);
        recyclerview.setLayoutManager(layoutManger);
        adapter = new CourseAdapter(courseList);
        recyclerview.setAdapter(adapter);
    }
    // 省略其他代码
    protected void initCourseList() {
        List<Course> courseDB = DataSupport.findAll(Course.class);
        for (Course cou : courseDB
                ) {
            Course course = new Course();
            course.setId(cou.getId());
            course.setCourseName(cou.getCourseName());
            course.setVideoContext(cou.getVideoContext());
            courseList.add(course);
        }
    }
}
主要通过适配器将 list 进行传入。在 initCourseList 中通过获取到数据库中的值,然后进行遍历,将遍历的结果存到 Course 中,最后将 Courese 放到 list 中。
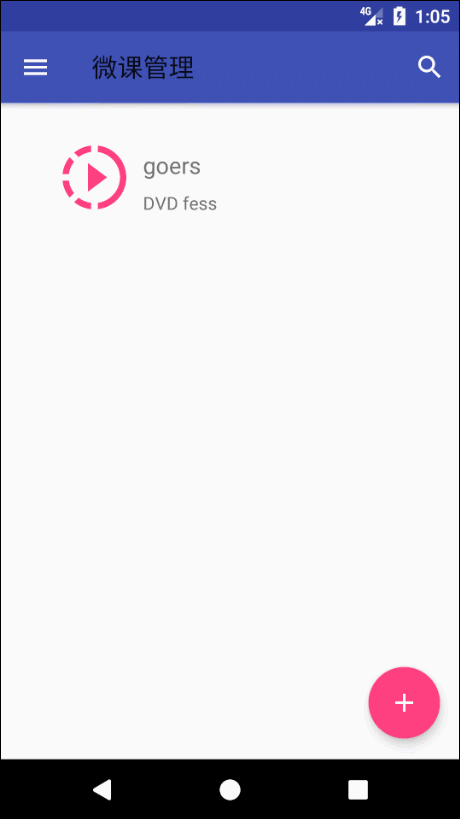
在这里要说明一下,有可能 RecycleView 被其他控件遮挡,最后一个只能显示出一半。如下图。解决办法就是调整布局,应该是 item 的布局有问题。

数据库存取
这是我第一次使用 Android 数据库。对于 Android 的数据库想想就知道很麻烦,因为无法查看,要在真机上查看还比较方便,要是在模拟器上查看,还要打开 Moniter ,在从 Moniter 把数据库导出,然后在通过看数据库的软件看是否写入成功。不仅仅这个,还要看 SQL 语句是否写对了,想想都觉得很麻烦。
在 《第一行代码(第二版)》中看到了 Litepal 这个框架,瞬间感觉到了压力减轻。在郭霖大神的博客里也很详细的介绍了这个框架的使用。
具体使用就不多介绍了,请转跳郭霖大神博客 [Android数据库高手秘籍(零)——前言](http://blog.csdn.net/guolin_blog/article/details/38083103)
在表关联的时候,一对多关联的时候,因为是更新表,所以曾经一度无法写入数据。例如 我创建的user表和plan表,在plan表中有一个 user_id 的字段,但是一度写不进去。后来查了资料,应该如下这样写。
  public void setInfo() {
            String id = String.valueOf(MainActivity.userID);
            User user = DataSupport.find(User.class, MainActivity.userID);
            Plan plan = new Plan();
            plan.setPlanTitle(planTitle.getText().toString());
            plan.setPlanContext(planContent.getText().toString());
            String date1 = tv_startTime.getText().toString();
            plan.setStartData(date1);
            plan.setUser(user);
            plan.save();
            user.getPlanList().add(plan);
}关键在于plan.setUser(user)要先 set User对象,在 save ,user.getPlanList().add()方法添加 plan ,这样在更新表的时候才会关联起来。
多媒体文件获取
获取多媒体文件首先要获取权限,在配置文件中添加相应的权限。通过 intent 打开Android 的文件管理器
public void chooseVideo() {
        Intent intent = new Intent(Intent.ACTION_GET_CONTENT);
        intent.setType("video/*");
        intent.addCategory(Intent.CATEGORY_OPENABLE);
        startActivityForResult(intent, 2);
    }
这里的 video/* 是获取视频,同样修改可获取其他 比如任意文件 */ * 等。
之后的部分其实还不太懂,等搞明白在补全这块。
下拉刷新
下拉刷新,使用的控件叫做 SwipeRefreshLayout ,然后对该控件添加监听事件
swipeRefreshLayout.setOnRefreshListener(new SwipeRefreshLayout.OnRefreshListener() {
            @Override
            public void onRefresh() {
                refreshList();
            }
        });
我们的 refreshList 中主要是开启一个新的线程来加载我们要展示的 list。
在加载 list 之前我们一定要先清空它,否则会出现重复加载。
    private void refreshList() {
        new Thread(new Runnable() {
            @Override
            public void run() {
                try {
                    Thread.sleep(1000);
                } catch (InterruptedException e) {
                    e.printStackTrace();
                }
                runOnUiThread(new Runnable() {
                    @Override
                    public void run() {
                        courseList.clear();
                        initCourseList();
                        adapter.notifyDataSetChanged();
                        swipeRefreshLayout.setRefreshing(false);
                    }
                });
            }
        }).start();
    }
这样就可以获得刷新列表,重新读取数据库数据。
总结
这个项目日后应该还会维护,添加一些新的功能,完善一些不足之处,比如添加点击的水波纹效果,点击浮动。添加获得视频的预览图等等。会不定期更新。
相关内容
如果你觉得这篇文章对你有所帮助,欢迎赞赏~
赞赏